
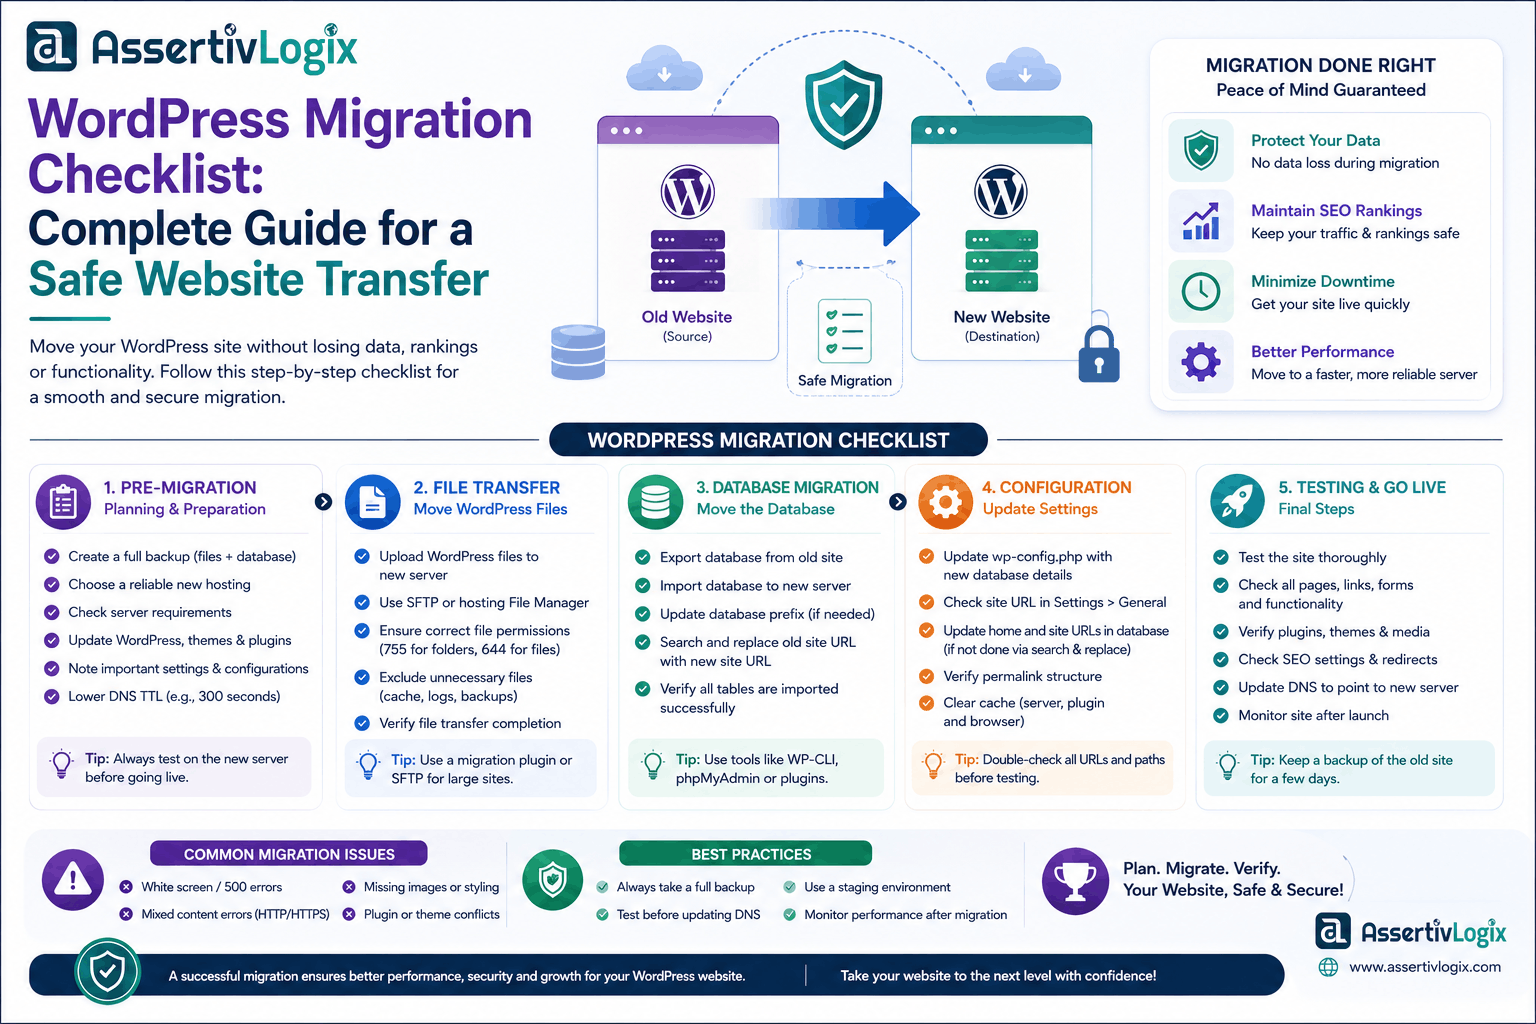
Migrating a WordPress website may seem like a simple task, but without proper planning, it can lead to downtime, broken links, missing files, SEO issues, and even data loss. Whether you’re moving to a new hosting provider, changing your domain name, or redesigning your website, following a structured migration checklist ensures a smooth and successful transition.
This guide walks you through every step of the WordPress migration process—from planning and backups to testing and post-migration optimization. By following these best practices, you can minimize risks and keep your website performing at its best.
What Is WordPress Migration?
WordPress migration is the process of transferring a WordPress website from one hosting provider, server, or domain to another. A complete migration includes website files, themes, plugins, media uploads, the database, configurations, and DNS settings.
Common reasons for migrating a WordPress website include:
- Switching to a faster hosting provider
- Moving from a staging environment to production
- Changing your domain name
- Upgrading server infrastructure
- Improving website performance
- Enhancing security
Why Proper Planning Matters
A poorly executed migration can negatively affect your website’s SEO, customer experience, and business operations. Careful planning helps prevent broken pages, missing content, and unnecessary downtime.
Benefits of following a migration checklist include:
- Reduced downtime
- Improved data protection
- Better SEO preservation
- Faster recovery if issues occur
- Smoother user experience
Pre-Migration Checklist
1. Audit Your Existing Website
Before moving your website, review its current setup.
- List active themes and plugins.
- Check WordPress and PHP versions.
- Review custom code and integrations.
- Identify unnecessary plugins or files.
2. Create a Complete Backup
Always create a full backup of your website before starting the migration.
Your backup should include:
- WordPress files
- Database
- Media uploads
- Configuration files
- Custom themes and plugins
3. Record Current Performance
Measure your website’s performance before migration so you can compare results afterward.
You may also find our guide on WooCommerce Performance Guide useful if you run an online store.
4. Lower DNS TTL
Reducing the DNS Time to Live (TTL) before migration helps DNS changes propagate more quickly, minimizing downtime.
5. Update WordPress
Ensure WordPress core, themes, plugins, and PHP are updated before migration to reduce compatibility issues.
Migration Checklist
6. Export Website Files
Download all WordPress files, including themes, plugins, uploads, and configuration files.
7. Export the Database
Export your MySQL database using phpMyAdmin or your preferred database management tool.
8. Set Up the New Hosting Environment
Configure your new hosting account by installing the required PHP version, creating a database, and enabling SSL certificates.
If you’re still selecting a provider, read our guide on Best WordPress Hosting.
9. Upload Website Files
Transfer your website files to the new server using FTP, SFTP, SSH, or your hosting control panel.
10. Import the Database
Import the exported database into your new hosting environment.
11. Update wp-config.php
Modify the database credentials to match the new server configuration.
12. Search and Replace URLs
If the domain changes, update all internal URLs within the database to prevent broken links and missing media.
13. Test Using a Temporary URL
Before changing DNS, verify the website using a temporary URL or hosts file modification.
Post-Migration Checklist
14. Update DNS Records
Point your domain to the new hosting provider after confirming the migrated website works correctly.
15. Verify SSL Certificates
Ensure HTTPS loads properly across the website and resolve any mixed-content warnings.
16. Test Website Functionality
Check every major feature, including:
- Homepage
- Navigation menus
- Forms
- Search
- Contact pages
- Images
- Downloads
17. Test WooCommerce (If Applicable)
For ecommerce websites, verify:
- Product pages
- Shopping cart
- Checkout process
- Payment gateways
- Customer accounts
- Order emails
Optimize After Migration
Migration is an excellent opportunity to improve your website’s performance and security.
18. Enable Caching
Configure page caching, browser caching, and object caching where available.
19. Optimize Core Web Vitals
Review your Core Web Vitals after migration and make improvements if necessary.
Our article on How to Optimize WordPress for Core Web Vitals provides detailed guidance.
20. Improve Security
Review user accounts, install SSL certificates, enable two-factor authentication, and keep plugins updated.
Follow our WordPress Security Checklist for additional recommendations.
Common Migration Mistakes
- Skipping backups
- Not testing before updating DNS
- Ignoring SSL configuration
- Forgetting URL replacements
- Leaving debugging enabled
- Not checking redirects
- Missing media files
Migration Checklist Summary
- Audit your website.
- Create a complete backup.
- Record current performance.
- Lower DNS TTL.
- Update WordPress.
- Export files and database.
- Configure new hosting.
- Upload files.
- Import the database.
- Update configuration.
- Replace URLs.
- Test thoroughly.
- Update DNS.
- Verify SSL.
- Monitor performance.
Frequently Asked Questions
How long does a WordPress migration take?
Small websites can often be migrated within a few hours, while larger or ecommerce websites may require more time depending on their size and complexity.
Will migration affect SEO?
If performed correctly, migration should have little to no negative impact on SEO. Maintaining URL structures, implementing proper redirects when necessary, and updating sitemaps help preserve search rankings.
Should I migrate manually or use a plugin?
Migration plugins are suitable for many standard websites. For larger, business-critical, or highly customized sites, a manual migration performed by experienced developers often provides greater control and reliability.
Conclusion
A successful WordPress migration is about more than copying files from one server to another. Proper planning, thorough testing, and post-migration optimization are essential to maintaining website performance, security, and search visibility.
By following this checklist, you can confidently move your WordPress website while minimizing downtime and avoiding common migration pitfalls. Whether you’re upgrading hosting, changing domains, or launching a redesigned website, a structured migration process ensures your visitors continue to enjoy a seamless experience.
If you’re planning a complex migration or want expert assistance, the team at Assertivlogix offers professional WordPress Development, website migration, WooCommerce development, performance optimization, and ongoing maintenance services to help your website transition smoothly.